We have rounded up some of the best macOS Big Sur tips and tricks to help you squeeze every inch of the device and take your productivity to the next level. Let’s start with the most basic one.
1. Go multi-window in macOS Big Sur
I. Use the default option
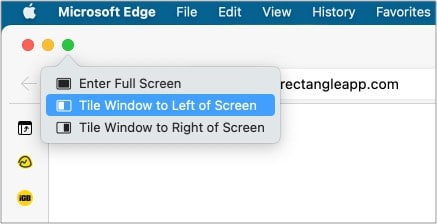
You can view two apps side-by-side using the default multi-window option. Open any app and hover the mouse pointer to the full-screen window icon. The OS will offer you to enter a full-screen mode or pin the window to left or right. Alternatively, you can go to the Windows option in the Menu bar and select Tile Window to Left of Screen/Tile Window to Right of Screen. The OS will pin the app based on your choice. You can choose a second app on the other side or open one from the Dock. Apple also allows you to resize the window. Drag the slider to the left or right for more space for your preferred app.
II. Use the Magnet app
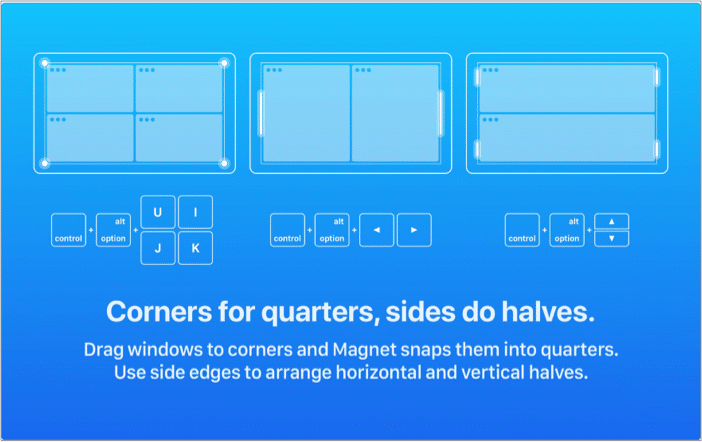
Apple’s default solution is basic at best. Magnet helps you use more than two apps on a single screen. The Magnet app allows you to multitask with many apps open. You can arrange your windows as per your preference, and the app makes the process swift and easy. With a single drag to the edge of the display, you can size a window in half. Drag the app to corners to turn them into quarters. Go ahead, give it a try and take advantage of the big iMac screen. Price: $7.99 (One-time purchase) Download
III. Go with the Rectangle app
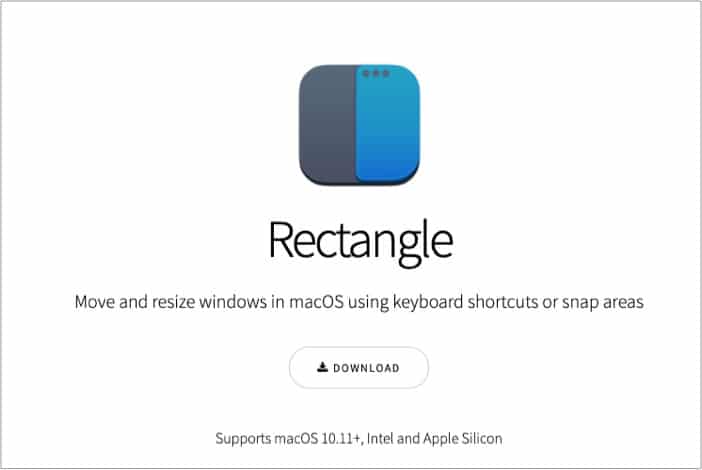
Looking for a free Magnet alternative to resize windows on the iMac? We have another app for you – Rectangle. It’s an open-source and free app to move and resize windows in macOS using keyboard shortcuts or snap areas. The app also allows you to set gestures for window management and more. Being open-source, Rectangle offers some obvious open-source advantages over its closed-source rivals. The set of functionalities should be more than enough for anyone looking to try window manager for the first time. Download
2. Clean your Mac regularly
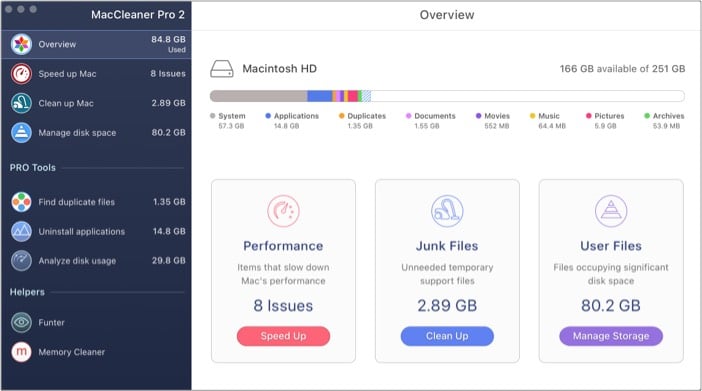
Both the latest MacBook and 24-inch iMac start with 256GB of SSD. After using it for a couple of months, your device is going to fill up with irrelevant files, apps, and cache data. There is no easy way to identify and remove junk files from the Mac. Enter a third-party solution called MacCleaner Pro. It is an all-in-one Mac utility app offering various tools in a single solution. You can take an overview of the Mac storage, speed and clean it up, manage disk space, find duplicate files, uninstall apps, and more. By default, MacCleaner Pro analyzes the app for a few minutes and offers you several suggestions to tackle performance issues on the Mac. With a single click, you can remove all the unneeded temporary support files from the device. I have been using MacCleaner Pro for the last six months. And the app typically finds and removes a couple of GBs of cache and junk files every month. Price: $44.95 (One-time purchase) Download
3. Use the advanced search option
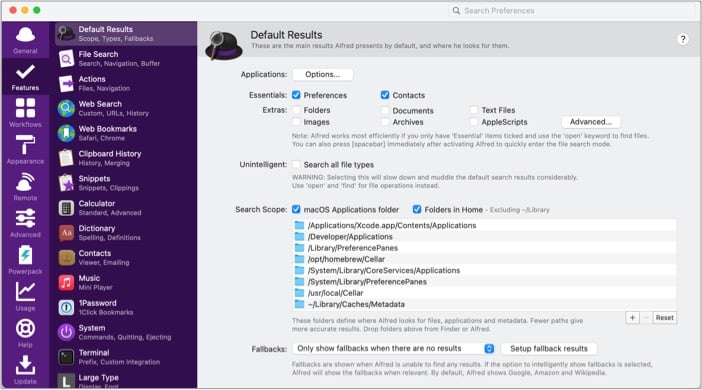
The Spotlight Search works perfectly fine for the majority out there. However, it leaves a lot to desire for power users. Alfred is a powerful Spotlight Search alternative for Mac. Unlike Spotlight Search, Alfred works with third-party apps such as Google Chrome and 1Password. My favorite function from the bunch is system commands. Allow me to elaborate. The app allows you to access system commands such as Sleep, Shut Down, Quit, and more. No need to use Magic Mouse or MacBook trackpad to navigate the most-used functions on the device. Simply fire up the Alfred app and type system commands. Alfred also allows you to create complex workflows. It’s like IFTTT (If This Then That) on steroids. Most functions are free to use. Features like workflow and 1Password integration are a part of the powerpack plan. Price: £29 (Single License) Download
4. Add widgets in Control Center
Apple carried over the iOS widgets to the Mac as well. You can add as many widgets as needed to the Notification panel of the Mac. With a single click on your Mac, you can view information from apps such as Apple Notes, Reminders, Microsoft Outlook, Bear Notes, Podcasts, and more. At any point, you can edit, remove, and rearrange widgets in the notification menu. Here is how I use it. Widgets allow me to peek at the latest news from the notification center using the Apple News widget.
5. Get more screen space
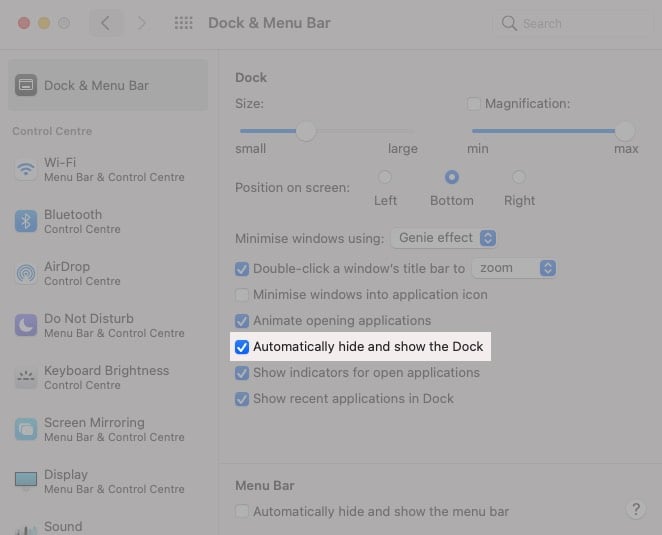
The 24-inch iMac display space should be more than enough for the majority out there. However, you might be left asking for more screen real estate on a 13-inch MacBook. macOS offers a neat trick to hide the Dock when an app is open to help you out. Go to System Preferences → Dock & Menu Bar → enable Automatically hide and show the Dock. This will expand the default screen space on the Mac.
6. Use a PDF editor
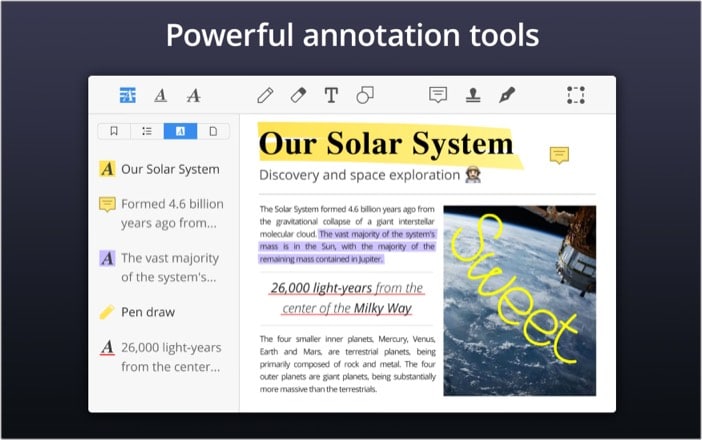
While many typically edit PDFs on the iPhone, the big screen of Mac and iMac adds convenience, ensures attention to detail, and prevents errors. Thus, it makes sense to work on essential files on your macOS device. The Mac ecosystem is full of capable PDF editors. However, PDF Expert stands out with the M1 CPU support and rich features. Using PDF Expert, you can view PDF pages and edit them using the highlighter, text, comments, signature, stamps, and other in-built tools. The software is also helpful to read an e-book. Don’t forget to use a multi-color highlighter to bookmark your reading progress. Download
7. Vertical tabs in Microsoft Edge
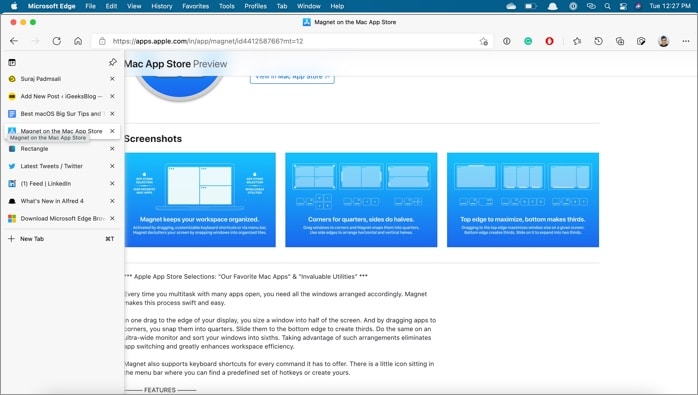
Microsoft Edge is an excellent Chromium-based Safari alternative for Mac. It supports all the Google Chrome extensions, goes light on the RAM usage, offers an innovative Kids mode, and allows you to take advantage of a widescreen with vertical tabs management.
Vertical tabs are my favorite feature on Microsoft Edge. I have been using it since its introduction in the last month. I can’t wait for you to try it on your shiny new MacBook or 24-inch iMac. Download
8. Customize Safari tabs
Even though the Mac has plenty of Safari alternatives, the majority still stick with what comes out of the box. One such example is the Safari browser. With the macOS Big Sur, Safari received a nice UI makeover with dozens of new features.
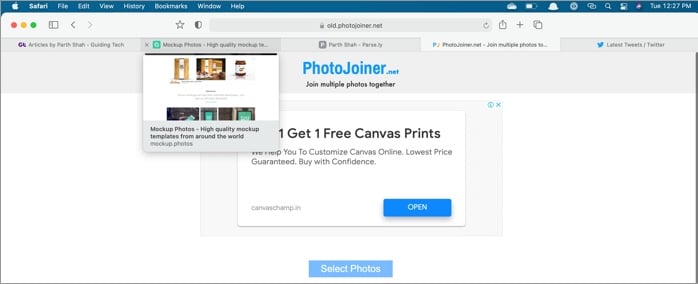
One such feature is tab customization. You can hover the mouse pointer over the tab to take a peek at the tab preview. One can also pin a tab to the left side to view more tabs at once on a big screen. The feature is smooth and nifty!
9. View blocked site trackers
True to Apple’s claim to protect user privacy, the Safari browser tracks and blocks all the unwanted social and malicious trackers from a webpage. To see which sites have been blocked during web browsing, click the Trackers menu at the top. You can view live data around how many trackers got blocked by the browser.
10. Use Safari’s built-in translation
If you come across a non-native webpage language when browsing on your iMac, you can opt for Safari’s built-in translation feature. It will translate web pages to your preferred language.
11. Change accent and highlight colors
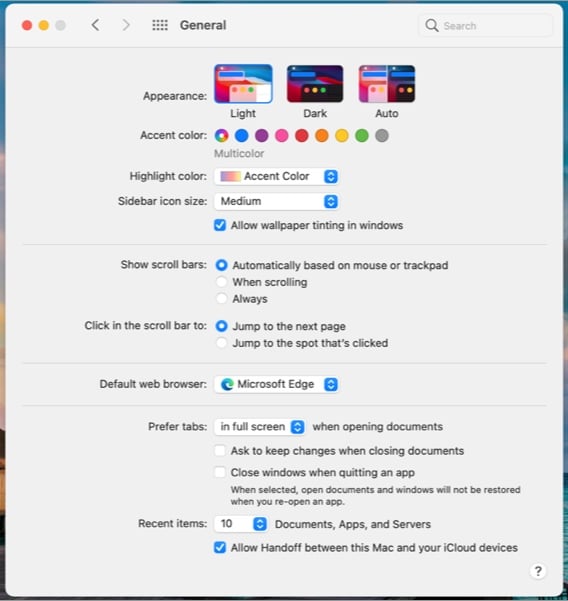
Apple continues to offer new M1 MacBook in the same dull Silver, Grey, and Gold colors. However, the 2021 iMac is getting vibrant colors that match perfectly fine with the rest of the home interior. The Cupertino company is offering a new M1-powered iMac in seven new colors. So, why not match those bold colors on the outside with the software as well? In comparison to Windows, macOS doesn’t offer many customization options to change its look and feel. However, if you wish to add some personality to your software, changing the accent and highlight colors can help.
Click the Apple icon at the top menu bar → Go to System Preferences -> General → select the Accent color and Highlight color of your choice.
12. Edit videos
The A14-based M1 CPU in the Mac lineup continuous to be the primary selling point of the device. The new CPU can handle resource-hungry tasks like editing 4K videos without breaking a sweat. Many benchmarks and testings have confirmed M1’s advantage over Intel rivals when editing and exporting videos. The M1 CPU will enable many beginners and professionals to edit 4K videos. As for the video editing software, we have seen the majority sticking with Final Cut Pro on the Mac. If you switch between Windows and Mac, Adobe Premiere Pro is also an excellent place to start the journey. If you are learning video editing, go with Apple’s iMovie software. It is simple and has multiple features that a beginner can use intuitively.
13. Master keyboard shortcuts
macOS Big Sur supports helpful keyboard shortcuts to get things done. Without lifting fingers from the Magic Keyboard or Magic Mouse, you can perform system tasks such as searching the Finder menu, using the emoji menu, showing or hiding Dock, and more. We would advise you to master those relevant macOS keyboard shortcuts. Here is a list of frequently used keyboard shortcuts on the Mac to help you get started. Read our dedicated post to learn how to see all the keyboard shortcuts for any Mac app.
14. Use Mac Control Center
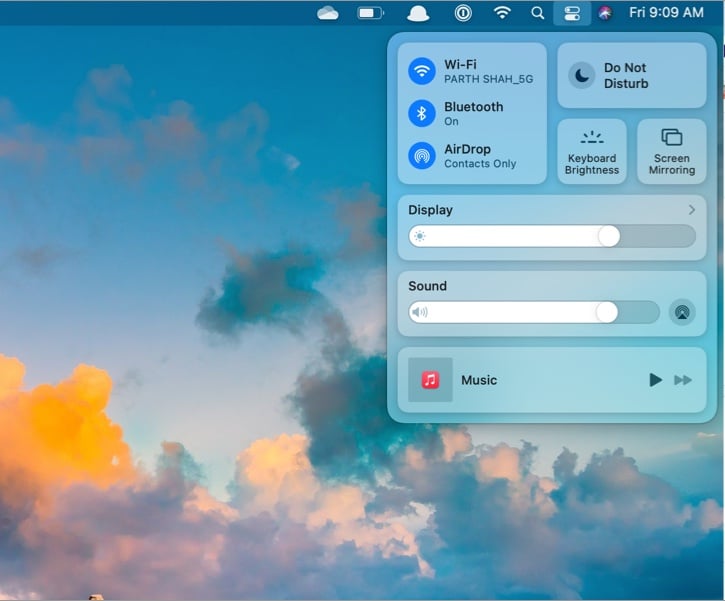
With macOS Big Sur, Apple is further closing the gap between iOS and macOS. The company has brought the Control Center to the Mac. Click the Control Center icon in the Menu bar to access most-used functions such as Bluetooth, Wi-Fi, Brightness slider, Keyboard brightness, and Screen Mirroring.
What’s more? You can simply drag and drop those elements from the Control Center to the Mac menu bar for easy access.
15. Pin Conversations in the Messages app
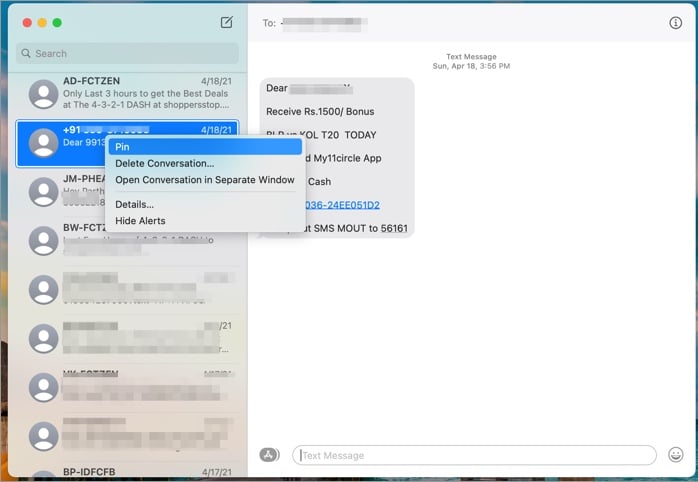
If you are a heavy iMessage user, you might get lost in a sea of conversations and miss important messages from friends and family. But no more! With macOS Big Sur, Apple borrowed some features for the Messages app from iOS 14. You can now use the two-finger click or right-click a conversation in the Messages app and pin it at the top.
I hope the above tricks help you to unleash 2021 iMac’s capabilities better. We are sure that you will see positive results after implementing our suggestions. Which trick did you find the most useful from the list? Share in the comments section below. You would like to read these posts as well:
How to uninstall apps on MacUse Memoji on MacHow to Show Battery Percentage on MacHow to Send Messages with Effects on Mac


![]()

